Estimated reading time: 11 minutes
ADA Bathrooms: How Calahan Bath Builds Safe, Code-Compliant Spaces
We’ve all squeezed into a cramped bathroom. Now, imagine navigating that same space in a wheelchair! This challenge is why the Americans with Disabilities Act (ADA) was created—not just as a building code, but as a landmark civil rights law ensuring public spaces are safe and accessible for everyone.
While following ADA bathroom specifications is a legal requirement for businesses, these rules also serve as a “gold standard” for private homes. They offer a trusted blueprint for designing a bathroom that gives an aging parent or a family member with mobility challenges greater safety and independence. Understanding these standards is about more than measurements; every rule is rooted in providing dignity and ensuring a simple trip to the restroom is a safe experience for all.
The First Step to Access: Does Your Bathroom Door Meet a Wheelchair’s Needs?
The journey into an accessible bathroom begins at the door. For a wheelchair user, the most crucial measurement is the clear opening, which must be at the very least 32 inches wide (think about the width of a wheelchair and their hands on the sides of the wheels propelling them forward). This 32″ (we prefer 36″ where possible) isn’t the door slab itself, but the actual usable space from the open door’s face to the opposite doorstop. The handle is also critical. Round knobs that require tight gripping are a barrier, so accessible hardware must feature a lever that can be operated easily with one hand or an elbow.
After the handle and width, look down at the threshold. A small strip on the floor can feel like a curb to a wheelchair user. To ensure a smooth entry, thresholds can’t be higher than 1/2 inch and must be beveled; a nearly flat transition is always best. Of course, getting through the door is just the first step. Once inside, a user needs enough room to turn around and approach the fixtures.
Creating a U-Turn: The Secret to a Truly Navigable Bathroom
Getting through the door is one thing, but being able to move around is another. Every accessible bathroom must provide enough room for a person in a wheelchair to turn around completely. The gold standard for this is a 60-inch (or 5-foot) diameter turning circle. A wheelchair needs its own version of a U-turn to navigate from the sink to the toilet and back without a frustrating 12-point turn. This space must be kept completely clear of obstructions.

In addition to this turning space, each fixture requires its own dedicated clear floor space. You can visualize this as a reserved parking spot directly in front of or beside an element like the sink or toilet. It guarantees that a person can approach the fixture, stop, and use it without bumping into a wall. This non-negotiable rectangle of space ensures a person isn’t just in the room, but can actually use what’s in it.
Here’s where smart design comes in. These clearances can overlap. The 60-inch turning circle can share clear floor space with the sink and toilet, making an efficient layout possible even in smaller rooms. With maneuverability sorted, we can now focus on the fixtures.
The Toilet Zone: Three Numbers That Ensure Safety and Accessibility
For an accessible bathroom, the toilet’s placement and dimensions are non-negotiable. First, consider the height. An ADA-compliant toilet seat must sit between 17 and 19 inches off the floor—a height similar to a standard dining chair. This specific range is critical because it aligns closely with the seat height of most wheelchairs, making the transfer from the chair to the toilet safer and less strenuous.
Just as important is the toilet’s location. The fixture must be positioned so that its toilet centerline—an imaginary line through the center of the bowl—is exactly 16 to 18 inches from the closest side wall. This precise measurement provides the necessary ada compliant toilet clearance for a wheelchair to park alongside the toilet while leaving the correct amount of space to mount a support bar on the wall.
Finally, the flush control must be on the open side of the toilet, facing away from the wall. This simple rule in the ada bathroom specifications ensures the handle can be operated without reaching over the toilet or twisting awkwardly. It’s a small detail that preserves balance and ease of use, working in tandem with the support system of grab bars.
The Definitive Guide to ADA Grab Bar Placement
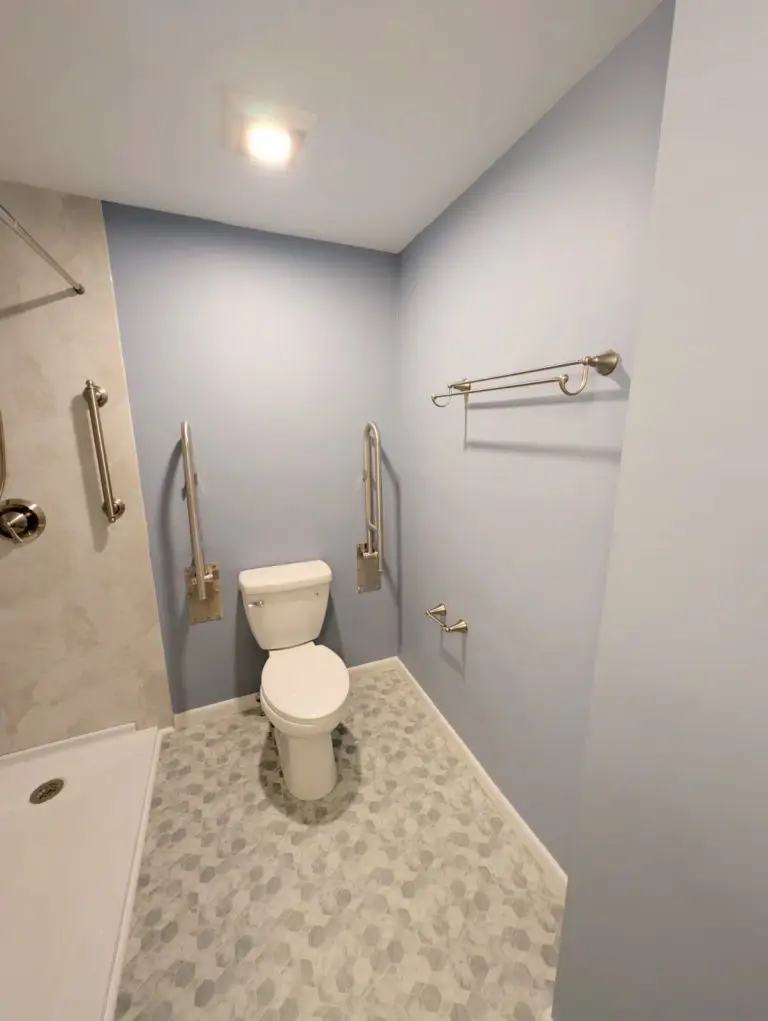
Once the toilet is perfectly positioned, grab bars provide the essential support system for safety and independence. These bars are not just helpful accessories; they are a user’s primary tool for leverage when sitting, standing, or transferring from a wheelchair. This ada grab bar placement guide covers the two non-negotiable bars that must be installed for a stable and accessible toilet area.
Correct placement is everything, ensuring the bars are exactly where a person needs them. When renovating a bathroom for accessibility, follow these key measurements precisely:
- Rear Bar: Must be at least 24 inches long and placed on the wall behind the toilet.
- Side Bar: Must be at least 42 inches long and placed on the wall closest to the toilet. (You can also use an additional folding up and down grab bar for the side of the toilet not against the wall)
- Height for both: Both bars should be mounted 33 to 36 inches from the floor to the top of the gripping surface.
This two-bar system creates a crucial safety zone. The rear bar is for pulling oneself forward, while the long side bar provides a continuous handhold for stabilization during transfer. Together, they work within the ada compliant toilet clearance to offer reliable support without obstructing movement.

How to Choose an ADA Compliant Sink and Faucet
A truly accessible sink allows someone in a wheelchair to pull up close and use it comfortably. To meet these accessible sink requirements, the top edge of the sink can be no more than 34 inches from the floor. More importantly, there must be open space underneath for a person’s knees. This is why you cannot place a standard vanity cabinet below an ADA-compliant sink—it creates a barrier. The plumbing must also be insulated or configured to prevent contact with a user’s legs.
The faucet controls are just as critical. Imagine trying to turn a small, slippery knob with limited hand strength. To prevent this, ADA compliant faucet controls must be operable with one hand and minimal force. This means avoiding traditional round knobs. Instead, opt for lever-style handles, push-buttons, or touchless, motion-activated faucets, which are easiest for everyone to use.
By providing enough room underneath the basin and installing simple controls, you ensure the sink is fully functional. This station, like the toilet, requires its own dedicated clear floor space for fixtures, allowing for a direct and unobstructed approach.
The Final Touches: Why Mirror and Hook Height Matter IN ADA Bathroom
A well-placed sink is only half the battle; the mirror above it must also be usable for everyone. For this reason, the ADA bathroom mirror mounting height requires the bottom reflective edge to be no more than 40 inches from the floor. This rule guarantees that a person in a wheelchair has a clear and comfortable view, preventing the frustrating experience of only seeing the wall. An angled mirror might also be a huge benefit in this case, and gives you the added bonus of being able to be adjusted for those sharing the bathroom who are not confined to a wheelchair.
The small conveniences often make the biggest difference on an accessible bathroom design checklist. A simple coat hook, for example, must be placed within reach. The ADA specifications call for at least one hook to be located no higher than 48 inches. This thoughtful placement allows someone to manage their belongings independently, turning a functional space into a truly welcoming one.
How Calahan Bath Turns These ADA Rules into a Safe, Welcoming Space
Understanding the rules for door width and fixture height is a great start, but creating a truly safe space involves more than just measurements. When renovating a bathroom for accessibility, the expertise lies in seeing how individual requirements work together. That’s where Calahan Bath comes in. We transform complex standards into a cohesive design that is both safe and welcoming, ensuring the final room feels spacious and intuitive, not just clinical.
A perfect example is what happens behind the wall. While guidelines tell you where to place grab bars, they don’t always emphasize that a bar attached only to drywall is a major hazard. Our process includes reinforcing the wall itself, ensuring these crucial supports are anchored solidly to provide real security when it’s needed most, as this is a non-negotiable part of building a bathroom you can depend on.
Finally, federal ADA rules are a national baseline, but local building codes often have different requirements. Navigating these variations is key to avoiding costly mistakes. The Calahan Bath team builds code-compliant ADA bathrooms by managing both federal and local standards, guaranteeing your finished space meets every legal requirement from day one and provides lasting peace of mind.
Your Accessible ADA Bathroom Checklist: The Key to Compliance and Safety
You’re no longer just looking at a bathroom; you’re now able to see a space through the lens of accessibility. While the full list of ADA bathroom specifications can seem complex, a few key measurements make the biggest impact on safety and independence.
In Short, here is your ADA accessible bathroom design checklist—a powerful tool for a quick review:
- Doorway: 32″ minimum clear width.
- Turning Space: 60″ clear circle.
- Toilet Height: 17″-19″ from floor to seat.
- Toilet Placement: 16″-18″ from centerline to side wall.
- Grab Bars: 33″-36″ high.
- Sink Height: 34″ max, with knee clearance below.
- Mirror: Bottom edge no higher than 40″.
This checklist is more than just numbers; it’s a starting point for creating a space that offers dignity to every user. Use this knowledge to assess commercial restroom ADA requirements or plan a home modification. For a project this important, your next step is to consult a certified professional who can ensure every detail is perfect and compliant with your local codes.
ADA Bathroom FAQs
Q: What is an ADA-compliant bathroom?
A: An ADA-compliant bathroom is designed to meet the standards of the Americans with Disabilities Act, providing enough clear floor space, proper fixture heights, grab bars, and accessible controls so people with mobility challenges, wheelchairs, or walkers can use the space safely and independently.
Q: Do ADA bathroom rules apply to my home, or only to public buildings?
A: Strict ADA standards legally apply to public and commercial spaces, but many homeowners choose to follow ADA guidelines in their own bathrooms to make them safer, easier to use, and “future proof.” At Calahan Bath, we use ADA specifications as a baseline and then adapt the design to your specific home and mobility needs.
Q: What are the key ADA restroom requirements I should know about?
A: Core requirements include a clear turning radius for wheelchairs (often a 60-inch circle), doorways at least 32 inches wide, properly placed grab bars, a toilet at accessible height, a sink with knee clearance underneath, slip-resistant flooring, and reachable controls (like faucets and switches) without tight grasping or twisting.
Q: How should an ADA bathroom layout be planned?
A: An ADA-friendly layout prioritizes clear, unobstructed paths to the toilet, sink, and shower, with enough open space to turn and transfer. Calahan Bath carefully measures your room, checks door swings, and plans fixture locations so you get both code-level accessibility and a layout that feels comfortable and natural to use every day.
Q: What are the requirements for grab bars in an ADA bathroom?
A: ADA standards specify bar placement, length, height, and how they must be anchored into blocking behind the walls. Typically, bars are placed beside and behind the toilet and along the shower or tub wall to support safe transfers. We at Calahan Bath install solid backing and heavy-duty hardware so grab bars are secure when you need them most.
Q: What makes a sink and vanity ADA-friendly?
A: An accessible bathroom sink allows a wheelchair user to roll up close, with open knee clearance underneath, insulated or protected pipes, lever or touch controls, and a mirror hung low enough for seated users. Calahan Bath selects and installs fixtures and cabinetry that meet these specs while still matching your style.
Q: How can Calahan Bath ensure my ADA bathroom is truly safe and up to code?
A: We start with ADA guidelines, then review your local building codes and your specific mobility needs. Our team handles the measurements, blocking, framing, plumbing, and finishes to match accessibility standards, and we coordinate with inspectors when required. The result is a bathroom that looks great, passes code, and keeps you and your loved ones safe for years to come.
- ADA Bathrooms: How Calahan Bath Builds Safe, Code-Compliant Spaces
- The First Step to Access: Does Your Bathroom Door Meet a Wheelchair’s Needs?
- Creating a U-Turn: The Secret to a Truly Navigable Bathroom
- The Toilet Zone: Three Numbers That Ensure Safety and Accessibility
- The Definitive Guide to ADA Grab Bar Placement
- How to Choose an ADA Compliant Sink and Faucet
- The Final Touches: Why Mirror and Hook Height Matter IN ADA Bathroom
- How Calahan Bath Turns These ADA Rules into a Safe, Welcoming Space
- Your Accessible ADA Bathroom Checklist: The Key to Compliance and Safety
- ADA Bathroom FAQs